Saturday, 12 October 2013

How to Send HTML Email

Posted by Anonymous On Saturday, October 12, 2013 No comments
Using HTML to Improve Your Email Newsletters
 
Email is one of the most popular Internet tools these days, but it can be very boring and ugly. After all, it's just text, right? But what if you could use HTML to create email that looks nice, includes images and links, and makes your email exciting.

Once you start using HTML email, your email will take on the feeling of a newsletter instead of just simple notes to your friends and family. You can even set up templates to send your email in a special format depending upon what you want to write.

What Do You Need to Send HTML Email?

To send HTML email, you need an email account that supports standard email protocols like POP, IMAP, and SMTP. Your email account should also support MIME types. Nearly all Internet email accounts work with POP or IMAP and use SMTP to send mail.

You'll need an email client or Web based email program that supports sending and receiving HTML email. Thunderbird is a good free email client, or you can use a Web-based client like Gmail or Hotmail to send and receive your HTML email.

Setting up Your Email

The easiest way to send your HTML email is to write your letter in the HTML editor in your mail client. Most modern mail clients now support embedding images, changing fonts, and adding colors and so on.

You should think of the email message as an extension of your Web site. Post the images on your Web site, and then when you link to them in your email message point to your Web site for the image source.

Be sure to use absolute paths. For both images and links. Remember, your readers are going to be at all different locations, so you need to use absolute paths in an HTML email to ensure that the images display and the links work.

How to Send Your Mail

Once you've built your HTML email, you send it with an email client that supports HTML email, like Netscape Messenger, Microsoft Outlook, Eudora, and others. In most of these clients, you will need to find the correct setting to set up HTML email.

Netscape Messenger (4.7):
  • Click on "Edit" and choose "Preferences"
  • Choose "Formatting"
  • Make sure "Use the HTML editor to compose messages" is selected
  • Decide how you want people who can't read HTML email to receive it
  • Click "OK"
Outlook Express:
  • Click on "Tools" and choose "Options"
  • Switch to the "Send" tab
  • Make sure that the Mail sending format is "HTML"
  • Click "OK"
Thunderbird
  • Choose Message > New Message or Ctrl-M 
  • Use the Thunderbird editor to add your HTML into your message directly 
Sending HTML Email Tricks
  • Some mail clients will let you use the <base href=""> tag in the <head> of your HTML email, but not all email clients support that tag
  • Background images (in the <body> tag) only work in some email clients
  • The bgcolor attribute works best if you put it in a table, and enclose your entire email in a single celled table
  • Most email clients that support HTML email, only support a limited version of HTML, it's best to avoid more complex things like frames in your email
Remember, Not Everyone Has HTML Email

If you send HTML email to a person who's email client doesn't support it, they will get the HTML as plain text. Unless they are a Web developer, comfortable with HTML, they may see the letter as a lot of gobbledegook and delete it without attempting to read it.

If you're sending out an email newsletter, you should give your readers the opportunity to choose HTML email or plain text. If you're just using it to send to friends and family, you should make sure they can read HTML email before sending to them.
 

Monday, 7 October 2013

How to install wordpress on Xampp server in Windows 8

Posted by Anonymous On Monday, October 07, 2013 1 comment
How to Install Wordpress on XAMPP
The goal of this guide is to show web designers how to install Wordpress [1] (2.8 or above) locally on their computers for the purpose of designing and testing Wordpress themes. Wordpress requires that the computer you are installing to has a web server (such as Apache, Litespeed, or IIS), PHP 4.3 or greater, and MySQL 4.0 or greater.

XAMPP [2] is an easy to install web server environment, which has all the previously mentioned components. All of the following instructions are based on the assumption that you have a XAMPP installation running locally on your machine. This tutorial does not discuss the installation of XAMPP. For more information about XAMPP, go to the official XAMPP (http://www.apachefriends.org/en/xampp.html) web site.

Step 1: Download and save the latest version of Wordpress from the following link: http://wordpress.org/download/
 
 
Step 2: Extract the contents of the ZIP file called "wordpress.zip", which was downloaded in step 1, to the htdocs folder within the XAMPP directory.If ZIP file extracted properly there should be a new directory called "wordpress" within the \xampp\htdocs directory.
 
Before the process can move forward, please ensure that the web server environment is running properly.
 
Step 3: Go to the XAMPP main page by opening a web browser and entering the following URL:
http://localhost/xampp/

Step 4: Select the link called "phpMyAdmin" on the lower left side of the menu or by entering the following URL: http://localhost/phpmyadmin/

Step 5: At the phpMyAdmin main page, there will be an area in the middle of the screen called "MySQL localhost". From this section a new database will be created for use by the Wordpress installation.

  • In the field labeled "Create new database" enter the name "wordpress". From the dropdown labeled "Collation" select "utf8_unicode_ci". Then press the button labeled "Create".
  • If the database entry was created successfully the message "Database wordpress has been created" should be displayed.

Step 6: Using the Windows Explore navigate to the xampp\htdocs\wordpress directory. Open the file called "wp-config-sample.php" within the wordpress directory.


Step 7: Once the file has been opened edit the following lines:

/** The name of the database for WordPress */
 define('DB_NAME', 'putyourdbnamehere'); ==> change 'putyourdbnameheree' to 'wordpress'

 /** MySQL database username */
 define('DB_USER', 'usernamehere'); ==> change 'usernamehere' to 'root'

 /** MySQL database password */
 define('DB_PASSWORD', 'yourpasswordhere'); ==> change 'yourpasswordhere' to ' ' (leave it blank)
 
Step 8: When the file has been edited as described in the previous step, save a copy of the file as "wp-config.php" in the wordpress directory and close the file.

Step 9: Go to the Wordpress Installation page by opening a web browser and entering the following URL:
http://localhost/wordpress/wp-admin/install.php

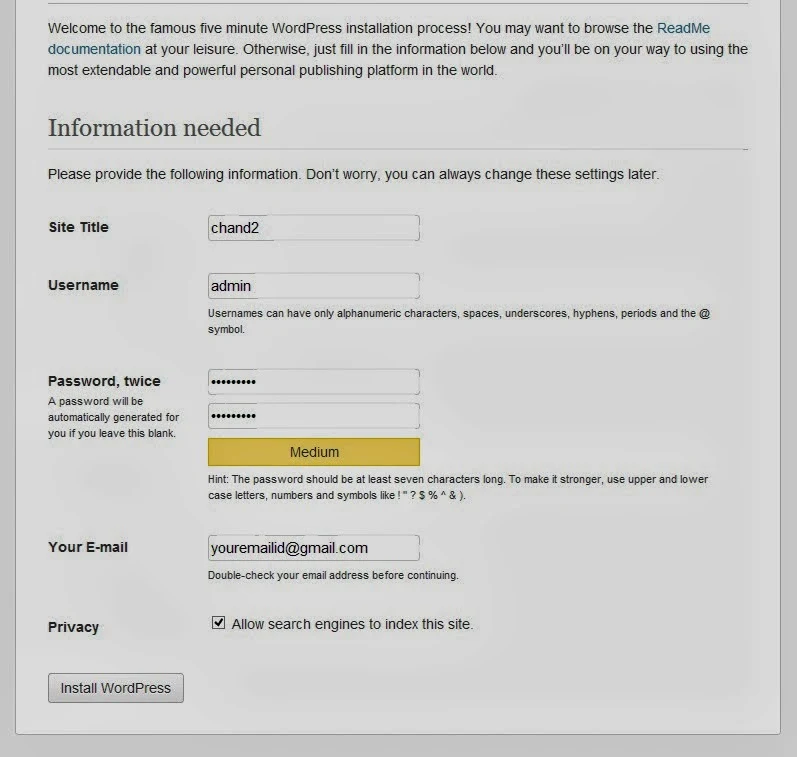
Step 10: Enter a title for the blog in the field labeled "Blog Title". Enter an email address in the field labeled "Your E-mail". Then press the button labeled "Install Wordpress".


Step 11: If the information in the previous step was entered correctly there should be a new screen titled "Success!". This screen presents a username called "admin" and a temporary password. It is a randomly generated password so it is important to make note of it until a new password has been selected. Press the button labeled "Log In".


Step 12: At the Log In screen type the word "Admin" in the field labeled "Username" and type the temporary password, which was created in the previous step, in the field labeled "Password". Press the button labeled "Log In".

Step 13: If the log in was successful then the Wordpress Dashboard appears. There is a notice which states that an auto-generated password is being used and to change it to something easier to remember. The link labeled "Yes. Take me to my profile page" allows the temporary password to be changed. Once the password has been changed editing of the content and themes can begin.

 
https://www.facebook.com/chand2like

Site search

    Submit URL