Showing posts with label Custom. Show all posts

Wednesday, 2 March 2016

How to solve Google SMTP Server attempt prevent error ?

Posted by Nikulsinh On Wednesday, March 02, 2016 36 comments
Before some time, I am working on my ASP.NET Project and Send mail to customer Email Address using Google Gmail SMTP Service Provide, but Google say me "Sign-in attempt prevented" and apear bellow message in my Gmail inbox:

Hi Unique
Someone just tried to sign in to your Google Account ........ from an app that does't meet modern security standards....


And after see message, Just i enable "Less secure apps" and SMTP working Fine and problem solve..


Gmail SMTP Configuration
smtp.Host : smtp.gmail.com
smtp.Port  : 587
smtp Username: your Gmail ID
smtp Password : your Gmail Password
More visit: Google Apps SMTP Setting Official

Less Secure Apps Access URL: 
https://www.google.com/settings/security/lesssecureapps


Saturday, 23 May 2015

How to Share Data between Two Computers

Posted by Nikulsinh On Saturday, May 23, 2015 1 comment
How to Transfer Data / File Between Two Computers PC to Laptop using LAN / Ethernet Cable

First - Go to Start Menu
  • Control Panel
  • Network and Sharing Center
  • Change Adapter Settings
  • Right Click on "Ethernet" and Choose 'Property'
  • Choose "Internet Protocol Version 4 (TCP/IPv4)" (Under Networking TAB)and Click on 'Property'
  • Click on "Use the Following IP Address:" and Enter Bellow IP Address
 First Computers / System
  •  192.168.0.1
  •  255.255.255.0
  Second Laptop / Computer / System
  •  192.168.0.2
  •  255.255.255.0

 And Click OK - Close
Second - Create User Account for Administration Account - Simply Add Password for This Account
  •  Press Win + C and Click on Settings
  •  Change PC Settings
  •  Accounts
  •  Sign-in Options
  •  Add Password
  
 Note: Your User-name is your Computer Profile Name and Password
  
Third - In Hard Disk Drive
  •  Right Click on Drive and Choose "Share With" 'Advanced Sharing'
  •  Advanced Sharing TAB (Click)
  •  Mark "Share this Folder" and OK  
Fourth - In Second Laptop / Computer / System , Go to My Computer (This PC)
  •  And Select Network
  •  Click First Computer and Enter User-name or Password
  •  Connected
Done Enjoy
 

Saturday, 18 April 2015

How to Open Safe Mode on Windows

Posted by Nikulsinh On Saturday, April 18, 2015 No comments
How to Open Safe Mode on Windows

Windows 7 or 8

 1. Restart your PC
 2. Press F8 Key (Pressing any time)
 3. Advanced Boot Options, Choose Safe Mode
 4. Opened Advanced startup options (including safe mode).
 5. Log on to your computer with a user account that has administrator rights.

Change file Permission [My friend need help]

 6. Open File, If opened then Rename file and Copy this file on another place hard disk
 7. Extract here
 8. Done

Windows 7 and Windows 8 - Simple Method to Open Safe Mode


 1. Open RUN Windows - Win + R
 2. Type " msconfig "       
 3. Click the Boot tab.
 4. Check the Safe boot option
 5. Select an option below that. Safe boot brings you to the standard Safe Mode. With networking does exactly what you think it does.
 6. Click OK, then Restart

https://www.facebook.com/chand2like

Friday, 20 March 2015

Google Remote Computer Access

Posted by Nikulsinh On Friday, March 20, 2015 No comments
We have looked at some of the various ways in which remote access of your computer can be achieved, including using TeamViewer and VNC, but if you have Chrome installed you can do the same with nothing more than a browser extension.

It does not matter whether you’re using Windows or OS X (sadly, Linux users are left out in the cold), all you need is the Chrome Remote Desktop extension.

You’ll need to install the extension on both the computer you want to be able to used remotely and any machines you want to be able to use to dial in. Start with the machine you want to be able to control.

This is actually a surprisingly large extension, weighing in at some 22.6MB, but it will install very quickly nonetheless. Once installed, click New Tab and you can access the remote access tool from the list of installed apps.

The first time you launch Chrome Remote Desktop, you’ll need to grant it permission to access your computer. Click Continue, make sure that you are signed into your Google account, and then click ‘Allow access’.

Chrome Remote Desktop can be used in one of two ways – to offer remote assistance to someone or to take remote control of another computer of your own. Click the ‘Get started’ button in the My Computers section. Click the ‘Enable remote connections’ button

As a security measure, you will need to choose a PIN to protect your computer, so enter and confirm a code that is at least six digits in length and then click OK.

You will also need to click Yes in the User Account Control dialog that appears to permit the changes. Once this is done, re-enter your PIN and click Confirm, followed by OK.

Now turn your attention to the machine you’d like to use to take control of your first computer. Run through the same steps to install the necessary extension in Chrome. Make sure that you are signed into the same Google account and then authorize the extension to access it.

Click the Get Started button in the lower portion of the page and you should see an entry for your other computer. By default, this is labeled using the name of the machine, but you can change it by clicking the pencil icon to the right and entering a new name.

To start a remote session, click the name of the computer you would like to connect to, enter the PIN you set up, and hit Connect.

You get to jump in and take control of your remote computer just as if you were sitting in front of it. At the top of the screen, you’ll find a slide-down drawer where there are a limited number of options.

The Disconnect button is self-explanatory, while the ‘Send keys’ menu makes it possible to send keyboard combinations to the remote machine without them being intercepted by the local computer.

From the ‘Screen options’ menu, you can toggle full screen mode on and off as well as choose between viewing the remote desktop at its native resolution or scaled to fit the size of your browser window.

Monday, 8 December 2014

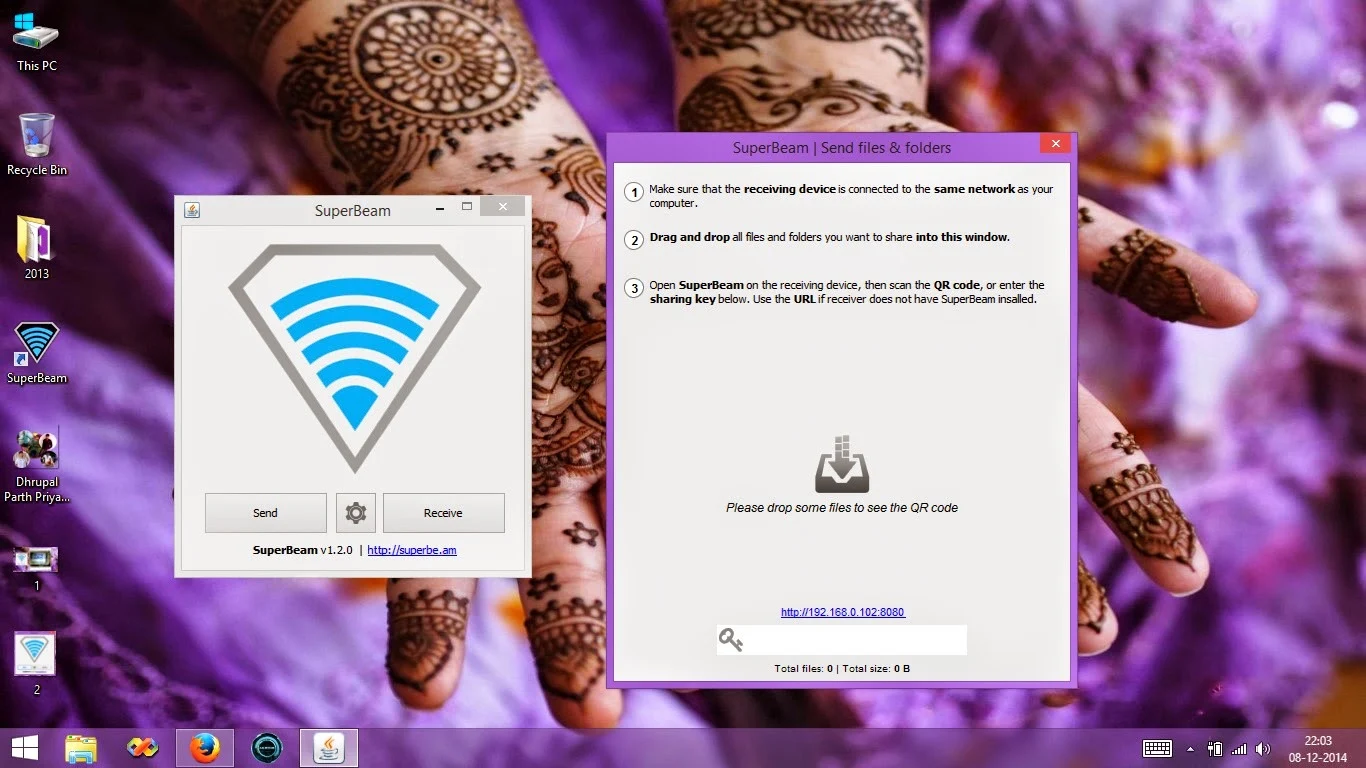
SuperBeam for PC & Android Full Version

Posted by Nikulsinh On Monday, December 08, 2014 1 comment
SuperBeam
Is the easiest and fastest way to share large files between Android devices using WiFi direct. Devices can be paired using QR codes (with the included QR code scanner) , NFC or manual sharing key (PRO).

No more clicks and manual approvals for connections. SuperBeam makes file sharing as convenient and fast as it should have been, because it is 2013 already!

Features:
  • Blazing fast transfer speeds using WiFi direct.
  • Pair devices using NFC or QR code scanning.
  • Sharing with devices that do not have SuperBeam through web interface.
  • Share single or multiple files of any type (photos, videos, zip files, APK's... You name it!).
  • Supports Android 2.3.3 and later.
  • Uses port 8080 for all types of transmissions, which means more compatibility on restricted WiFi networks.
  • Light and dark color themes.
All received files are stored under "/sdcard/SuperBeam" directory by default, this can be changed in settings (PRO). Don't worry about duplicate files, SuperBeam will automatically add unique numbers to duplicate file names.

SuperBeam Switches to hotspot mode automatically for devices that doesn't support WiFi direct. Also, it can use existing WiFi network connection between devices in case WiFi direct fails.

Get more, upgrade to PRO
  • Upgrade to SuperBeam PRO (on SALE for a limited time!) and get much more awesome features:
  • No more ads.
  • SuperEasy sharing with your computer using SuperBeam app for PC (compatible with Windows, Linux and MacOS)
  • Change default save location to any available storage.
  • Send entire folders and preserve their structure.
  • Receive using manual sharing keys.
  • Send to more than one device at the same time.
  • Share unlimited number of files on web interface, with the ability to download complete structured zip and share SuperBeam APK.
  • And much more!

Features
  • Send files from your computer to devices that have SuperBeam easily and quickly, using QR code or sharing key.
  • Easily receive from devices that has SuperBeam by scanning QR code (through webcam) or manually entering sharing key.
  • Works with any type of SuperBeam app (PC or Android)
  • Share with devices that do not have SuperBeam through web interface.

Requirements
  • Android devices must have PRO version of SuperBeam installed in order to work with PC app.
  • Any computer running Windows, Mac or Linux.
  • Java 6 or later (you may download it from here).
  • Firewall exception for outgoing ports 8080 and 8888.


Thursday, 21 August 2014

Windows 8 Shortcuts

Posted by Nikulsinh On Thursday, August 21, 2014 No comments
ShortcutDescription
Alt+DSelect address bar (Explorer)
Alt+EnterProperties
Alt+F4Close active item or app
Alt+Left-ArrowPrevious folder (Explorer)
Alt+SpacebarShortcut menu
Alt+TabSwitch between apps
Alt+Up-ArrowGo up one level (Explorer)
Ctrl+ASelect all
Ctrl+Alt+DDocked mode (Magnifier)
Ctrl+Alt+IInvert colors (Magnifier)
Ctrl+Alt+LLens mode (Magnifier)
Ctrl+Alt+TabSwitch between apps using arrow keys
Ctrl+CCopy
Ctrl+Down-ArrowNext paragraph
Ctrl+ESelect Search box (Explorer)
Ctrl+EscStart screen
Ctrl+F4Close active document
Ctrl+InsertCopy
Ctrl+Left-ArrowPrevious word
Ctrl+NNew window (Explorer)
Ctrl+RRefresh
Ctrl+Right-ArrowNext word
Ctrl+Shift+Down-ArrowSelect a block of text
Ctrl+Shift+EscTask Manager
Ctrl+Shift+Left-ArrowSelect a block of text
Ctrl+Shift+NNew folder (Explorer)
Ctrl+Shift+Right-ArrowSelect a block of text
Ctrl+Shift+Up-ArrowSelect a block of text
Ctrl+TabCycle through metro app history
Ctrl+Up-ArrowPrevious paragraph
Ctrl+VPaste
Ctrl+WClose current window (Explorer)
Ctrl+XCut
Ctrl+YRedo
Ctrl+ZUndo
DeleteDelete file (Explorer)
EscCancel
F1Display Help (if available)
F2Rename item
F3Search for file or folder
F4Display items in active list
F5Refresh
Left-ArrowOpen previous menu or close submenu
Right-ArrowOpen next menu or open submenu
Shift+InsertPaste
Shift+TabMove backward through options
SpacebarSelect or clear active check box
TabMove forward through options
WinStart screen
Win+,Peek at the desktop
Win+.Snap a metro app to the right (+Shift to snap to the left)
Win+COpen charms
Win+DShow desktop
Win+Down-ArrowRestore/minimize desktop window (+Shift to keep width)
Win+EOpen Windows Explorer
Win+EnterNarrator (+Alt to open Windows Media Center if installed)
Win+EscExit Magnifier
Win+FGo to Files in Search charm (+Ctrl to find computers on a network)
Win+F1Windows Help and Support
Win+GCycle through desktop gadgets
Win+HShare charm
Win+HomeMinimize non-active desktop windows
Win+ISettings charm
Win+JSwitch focus between snapped and larger apps
Win+KDevices charm
Win+LSwitch users (Lock computer if on a domain)
Win+Left-ArrowSnap desktop window to the left (+Shift to move window to left monitor)
Win+MMinimize all windows (desktop)
Win+MinusZoom out (Magnifier)
Win+OLock screen orientation
Win+PProjection options
Win+Page-DownMove Start screen to right monitor
Win+Page-UpMove Start screen to left monitor
Win+PauseSystem Properties
Win+PlusZoom in (Magnifier)
Win+QSearch charm
Win+RRun
Win+Right-ArrowSnap desktop window to the right (+Shift to move window to right monitor)
Win+SpacebarSwitch input language and keyboard layout
Win+TSet focus on taskbar and cycle through running desktop apps
Win+TabCycle through metro app history (use Ctrl to use arrow keys)
Win+UEase of Access Center
Win+Up-ArrowMaximize desktop window (+Shift to keep width)
Win+VCycle through notifications (+Shift to go backward)
Win+WGo to Settings in Search charm
Win+XQuick link power user commands (Opens Windows Mobility Center if present)
Win+ZOpen app bar

Wednesday, 2 April 2014

How to get Google+ Plus custom URL

Posted by Nikulsinh On Wednesday, April 02, 2014 1 comment
How to Create Custom URL in Google + Plus Profile
How to Get Custom URL Name in Google Plus Profile

A custom URL is a short, easy-to-remember web address that links directly to your Profile or Page. For example, YouTube's Google+ Page owners can direct people to plus.google.com/+RathodNikulsinhNic to visit their page rather than
plus.google.com/u/0/105100545386418168541/


          •If you’re eligible, you can get a custom URL for your Google+ Profile or Page.
          •Your custom URL can’t be changed. It will be reassigned based on things like your name or the name of your linked website. You may also need to add a few letters or numbers to make it unique to you.

Getting your custom URL through Google+
To get your custom URL:

1.Sign in to Google+. Place your cursor in the top left corner for the Google + main menu and then click  Profile.

2.Click the About tab, and under Links > Google+ URL, click Get URL.


3.You’ll see the custom URL you’ve been approved for, which you aren’t able to change. You may also need to add a few letters or numbers to make it unique to you.

4.Click the box next to “I agree to the Terms of Service” then click Change URL in the bottom left corner.

5.You may be asked to verify your account using your mobile phone number. To do this, you’ll need to:
      a. Enter your mobile phone number when prompted, then click Send code in the lower left corner.
      b. Check your phone for the code that was sent to you.
      c. Enter that code in the box on your screen, then click Verify in the lower left corner.


6. This URL will be linked to your Google+ Page or Profile, so be sure everything is exactly the way you want it. Once your URL has been approved, you cannot request to change it. When you're certain, click Confirm choice.


Change capitalization or accents of your custom URL
If you want to change the capitalization or accents/diacritics of your custom URL, follow these steps:

1.Sign in to Google+. Place your cursor in the top left corner for the Google + main menu and then click  Profile.

2.Click the About tab, and under Links > Google+ URL, click Edit.

3.A box will appear allowing you to make edits to the formatting.
Remember, you can only change the capitalization and diacritics of the URL, not the URL itself.

Eligibility requirements
To get a custom URL, your account needs to be in good standing and meet a few other requirements.
For Individual Users:

      •Ten or more followers
      •Account is 30 days old or more
      •Profile includes profile photo


For Local Google+ Pages: Must be a verified local business
For Non-local Google+ Pages: Must be linked to a website

Custom URLs must be used in compliance with the Google+ User Content and Conduct policies and the Google+ custom URLs terms of use.
If you find a custom URL that violates our policies, please report the Profile.

Site search

    Submit URL